Twists of the Solar Flux

Solar prom collage

January 18, 2008 Solar Prominences
By Erika Rix

20080118

Solar

PCW Memorial Observatory, Zanesville, Ohio USA, Lat 40.01/Long -81.56

Erika Rix

Still not quite recovered from the neck surgery, Paul was good enough to open and
close the roll off roof of the observatory for me.  I was able to carry down the
battery supply for the LXD75 for tracking as well as close up (after my session) the
southern drop down wall that enables me to view the Sun at the lower altitude.  The
enclosed area within the observatory certainly helps control the stability of the
scope with the winds today at 11.5 mph.  The temperature was comfortable at 26F, but
with the lack of surface details, I wrapped up the session in just less than an
hour’s time. 

The haze limited the performance at higher magnification, but with a little
patience, I had moments where I could drop down to 7mm (57x) with the zoom eyepiece.
 Seeing flipped back and forth and the best views seemed to be around 30x
magnification. 

There were 7 areas of prominences that I was able to record with no significant
surface detail.  Three of these areas were sketched. 

The brightest prominence was about 55 degrees PA and I did a three sketch sequence
of it noting the small changes in appearance over 40 minutes’ time span.  This was
after the original overall sketch of the limb.  The basic outline of this prom
really didn’t change a great deal.  But looking closely within the structure, there
was quite a difference in the intricate network.

At 1209ST (1709UT) at the end of the session around 70 degrees PA, a very bright
small blob of a prominence appeared and then left just about as quickly.  It may
have just been that I was able to see it well during a brief moment of steady clear
seeing.  Still, it was very noteworthy and I was happy to catch it.

Sketch media: black Strathmore Artagain paper, white Conte’ and white Prang pencils,
white vinyl eraser, fixative

Post processing: -25 brightness, +4 contrast, resized and created collage by pasting
selected prominences on black background.  Used digital disk for position angles
from Tilting Sun program.

Fire and Ice

Sun Ha

The Sun in Ha light on January 4th, 2008
By Erika Rix

2008 01 04
PCW Memorial Observatory, Zanesville, Ohio USA
Erika Rix
Solar

It was a beautiful sight today with the Sun gleaming off the snow. The snow was
melting fast as the temperature was slowly rising. Unfortunately, the snow didn’t
melt fast enough off the observatory roof, so I had to just drop down the upper part
of the southern wall and leave the roof completely on, otherwise, I would have had
to deal with water dripping on my gear in the observatory. As it turned out, it was
a good way to keep the winds at bay today, plus I’m sure kept me warmer in the more
enclosed space.

There were four very bright plage areas on the disk in h-alpha. One from NOAA 10981,
another large intricate plage structure for 10980, then a very thin bright one that
reached over to 10980 just inside the Eastern limb. The final was toward the West. I
could see a dark “spot” being cradled by the plage in 981, and by viewing in white
light, there was most definitely a small pore that appeared almost elongated. With
all the haze today plus winds during my white light filter session outside of the
observatory, it was difficult to tell if this elongation was another very tiny pore
just beside the larger one, or if it was just blurred from the conditions outside.
In any case, both to the NE and the SW of this dark dot were faint markings
resembling contrast of faculae. I couldn’t confirm what the markings were with this
observation.

 The Sun in white light

In white light, I could see no other evidence of active regions.

Getting back to h-alpha in the observatory, there were six areas of prominence
around the limb that I could see. With the haze and poor seeing conditions, I had to
wait for moments of clarity and steadiness to get good definition for closer looks.
Patience definitely proved to be valuable today.

The prominence to the SE just below the AR980 was very faint and fan-like. To the
very southern portion of it, it became brighter. I could almost make out all the
connections to each section of it.

Then at the western limb, slightly to the south was a very sharp brighter prominence
with several fingers reaching out like flames. I really enjoyed this one.

The show stopper of the session was most definitely the plage with a few dark thin
filaments looking as if they were separating the plage in AR980 and onward to the
eastern limb.

It’s said that a new solar cycle has begun, making it number 24. We’ll see, but it’s
looking promising.

Ecliptical Obliquity

Albategnius

Lunar crater Albategnius
By Dale Holt 

I awoke not particularly early at around 6am on Saturday December 1st, well it is
the weekend! I noted a fine gibbous Moon high in the South West from the bedroom
window. Hmm I haven’t made a Lunar sketch for a while, so out I went to the
observatory with my brew of tea and spent a while scanning the terminator for a
likely subject.
 
  I picked out Albategnius. This is an ancient lunar impact crater 129km wide and
4.4km deep located in the central highlands. It is named after the Arabic Prince
and astronomer  Al-Battani. The level interior forms a “walled plain”, surrounded
by the high, terraced rim. The outer wall is somewhat hexagon-shaped, and has been
heavily eroded with impacts, valleys and landslips. It attains a height above
4,000 meters along the northeast face. The rim is broken in the southwest by the
smaller crater Klein 44km wide and 1.5km deep.

  The third prominent crater featured in my drawing is Halley to the North East of
Albategnius spanning 36km at a depth of 2.5km.
  
  Telescope 14” F5 Newtonian reflector
  Denk binoviewer with 2.5x nosepiece
  x2 Celestron Axiom 23mm eyepieces giving 193x
  
  Drawing on Black A5 Daler Rowney artist paper using Derwent pastel and water
colour pencils, conte sticks, black ink and blending stumps.
  

Salt and Pepper in Cassiopeia

M52

M52 (NGC 7654) Cassiopeia Open Cluster
By Kiminori Ikebe

Difficulty level 1
Date of observation: 2002/01/05 20:30
Transparency/seeing/sky darkness: 2/2/3
Instruments: 32cm Dobsonian with XL21 at 70x
Width of field: 0.9 degree
This cluster is situated west of Cassiopeia’s letter W. It is fairly bright. Although it is a mid-size cluster, stars are well concentrated and individual member stars are bright and beautiful. At 90x it is almost fully resolved. A 7.9-magnitude star in the west stands out. There are many bright stars in the northwest. In the east there is a small condensation from where lines of stars extend outward. Also, a line of stars running from the center to the southeast attracts an observer’s attention. There is a triangular-shaped clump in the southeast somewhat detached from the cluster. There are many faint stars sprinkled in the outlying areas.

Mr. Ikebe’s sketch gallery can be found here: Visual Observation of Deep Sky Objects

Arm of the Eastern Veil

NGC 6992
NGC 6995
Eastern Veil Nebula – NGC 6992 and NGC 6995
By Kiminori Ikebe

Lying some 1400 light years away in the constellation Cygnus is the beautiful supernova remnant known as the Veil Nebula or Cygnus Loop. When the supernova first lit up the sky thousands of years ago, it likely shone with the brilliance of a crescent moon (magnitude -8). The eastern portion of this broken circle of nebulosity is catalogued as NGC 6992 and NGC 6995. The full area of the Veil Nebula spans more than 3 degrees of the sky. In order to capture much of the eastern arm, Mr. Ikebe broke it down into the two sketches shown above.

(Source: APOD}

Mr. Ikebe’s notes about this nebula:

A magnificent view. The nebulosity in the shape of an arch in which bright and dark areas entwine in a complex manner. It is not possible to describe in words. It is difficult to draw it accurately and this sketch only shows how this nebula is perceived. The Veil Nebula is one of the most complex but clearest objects in the northern sky. The nebulosity from NGC 6992 to NGC 6995 is the brightest part of the Veil Nebula and even 10×42 binoculars reveal an arch-shaped nebulosity clearly.

(Re: NGC 6995) The complex area on the southern end of the arch in the east. The tip of the nebulosity divides into several branches looking like a human hand trying to grasp something. Off the tips of the fingers there are two faint areas, which may be IC 1340.


Equipment used: 32 cm Dobsonian at 70X
Sketch Media: Black paper, white paint (for stars), white watercolor pencil, and tissue paper. A Japanese language discussion of Mr. Ikebe’s sketching technique with photos can be found here: How to Make a Sketch. Translating the page using Google Language Tools can help with some of the text.

Like a Tart

Lacus Excellentiae

 “She appears like a tart that my cooke made me last weeke, here a vaine of bright
stuffe, and there of darke, and so confusedlie all over. I must confess I can see
none of this without my cylinder”.
  
  These were the honest words of William Lower an amateur astronomer written upon
observing the Moon with his new “perspective cylinder” in 1608.
  In the history of Man Kind this is but a heart beat in time but how the telescope
has evolved from that primitive Galilean spy glass that only the privileged few
could ever hope to own! Now even the most modest instrument delivers views of the
heavens and Moon in particular that our astronomical forefathers could only have
dreamt of!
  
  One thing that hasn’t changed for me and countless others is the “confusedlie” of
the Moon. It is an awe-inspiring yet bewildering sight to all but the most
experienced lunar observer. I myself am very much a Lunar apprentice and each time
I fly over the terminator with my telescope and settle upon “she who takes my
heart” I am learning my way around not only the shadows, bright ridges and crater
rims but through my post sketch research feature names, dimensions and geological
composition.
  
  On the late evening my visual voyage of 250,000 miles at the eyepieces of my
binoviewer was just such an adventure.
  I deliberately selected a relatively demure region, shunning the bright and large
craters in a deliberate attempt to stray from the well trodden path.
  
  It turns out that my target area turned out to be Lacus Exellentiae. I was
initially drawn to a crater with a brightly lit rim just to the left of centre in
my drawing that my subsequent atlas searches found as being nameless apart from
being marked as (b) in a few of the atlases I own . The crater on the right close
to the terminator however turned out to be Clausius with a diameter of 24km and
was situated close the controlled crash site of the European Smart -1 Lunar
orbiter on September 3rd 2006.
  
  A happy hour spent and no longer so Confusedlie!
  
 
    Moon 11 days
   14″ (350mm) Newtonian 193x
    Sketch with Derwent watercolour pencils, Derwent Pastel pencils & conte hard
    pastels. Blending stumps used, sketch on lightweight black card.
    Finished worked scanned but un processed.
  
    Dale Holt
    Chippingdale observatory, Nr Buntingford, Hertfordshire UK

A Capacity for Opacity

Ha Sun 

2007 08 26, 1700-1928 UT

PCW Memorial Observatory, Zanesville, Ohio

Equipment used:

Internally Double stacked Maxscope 60mm, WO Binoviewers, 20mm WO EP’s, LXD75.

Meade ETX70-AT, 21-7mm Zhumell, glass white light filter.

Seeing above average with only a few moments of quivering, transparency above average.

Temps 80.1 °F / 26.7 °C to 78.1 °F / 25.6 °C over course of observation.

Winds 4.6 mph – 6.9mph NNE/ 11.1 km/h.

Clear progressing to mostly cloudy by the end of the session.

Humidity 54%

Sketching media: The white light sketch was done on copy paper with a number 2 pencil.

The Ha sketch color sketch was done using black strathmore paper with color Prang pencils.
 

Word for the day:  Opacity

According to my heavy, red, weathered Merriam-Webster’s Collegiate Dictionary (tenth
edition), opacity is defined as:

“n, .1: the quality or state of a body that makes it impervious to the rays of
light; broadly: the relative capacity of matter to obstruct the transmission of
radiant energy..2b: the quality or state of being mentally obtuse: Dullness.”

I kind of got a kick out this.  It appears that with one word, I can attempt to
discuss opacity of the Sun and yet at the same time try not to create opacity while
doing it.

Studying the Sun, as well as anything worthwhile, can be very confusing and
sometimes overwhelming.  It helps to understand the basics such as knowing that the
Sun is a giant ball of gas.  It has several layers starting at the inner most called
the core. The majority of the Sun’s core consists of hydrogen.  By nuclear fusion,
the hydrogen is converted into helium.  The key here is that in doing so, energy is
created. Energy equals heat.  All in all, when we think of the Sun, we think of
radiation, or electromagnetic radiation to be more specific.  Radiation is a process
that transports energy.  Electromagnetic radiation is a radiation that carries
energy through empty space by means of waves at the speed of light. 

You see, atomic particles (created by the nuclear reactions in the core) speed up
and grow from the exchange of varying flows of electrical and magnetic fields, which
is where electromagnetic radiation originates.  Following me so far?  Here’s where I
start to get back on topic.  Electromagnetic radiation has both wavelength and
frequency.  When you multiply the two together, you get the velocity of light.  If
one of the variables increases, the other has to decrease for the velocity of light
to stay constant.

Oh, how easily it would be to dive in further with all this.  But I need to stay on
track with the first definition of opacity.  Wavelengths are compiled in what we
call a spectrum.  And this is when we get into means possible for us to view the
Sun. 

Imagine the energy being transported through a few more layers of the Sun, each
layer quite a bit hotter than the previous as it extends away from the core.  We
finally reach the layer that most call the “surface” of the Sun, the Photosphere.
Does that look Greek to you?  Well, not to worry.  It is Greek.  The Greek word
“phot” stands for light and “sphere” of course stands for round ball. 

In the photosphere, the gas is heated so much that it burns bright giving off most
of its energy close to the middle of the spectrum, creating visible light.  And it
doesn’t end there.  Reaching out from that thin layer of burning gas is the
chromosphere, meaning round ball of color.  After a brief pass through the
transition region, the energy enters the corona and then outwards as solar wind.
Each layer is visible through specialized means.  Each layer involves our word for
the day, opacity.

One evening, quite a few years back, my brother in law and I were cooking supper
together. I was in charge of the chip pan and cutting up the potatoes.  I could see
him very clearly across the room and the air was transparent and had a zero optical
thickness.

As we were talking to each other from different ends of the kitchen, we soon noticed
that we were getting harder for the other to see. In other words, the optical
thickness was getting thicker.  By the time we became alarmed to this fact, the
smoke was nearly opaque with an optical thickness of close to 9.  I could hardly see
him anymore.  As he walked toward me, I could see him more clearly and by the time
he reached me the optical thickness was perhaps a 3.

We removed the smoking chip pan that caused the smoke from the stove, opened the
kitchen windows, grabbed the dog and a bottle of wine, and sat out on the steps of
the flat, watching the smoke roll out of the kitchen window.  I don’t recall what we
ever did for supper that night, but I suppose that’s beside the point. It was a
perfect example of opacity and how I measured it. The same is done when viewing the
Sun.

The further into the Sun we look, the higher the opacity. We can only see up to
approximately an optical thickness of between 0.5 and 2.  The photosphere is said to
have an optical thickness range of close to 3/4, and it includes all the light that
we can muster from the Sun, meaning white light.  If I wanted to view through a
narrowband filter such as a hydrogen alpha filter, the optimal optical thickness
would be reached before I even gazed into the Sun as far as the photosphere.  I
would in fact start at the Chromosphere.  This is wonderful news for us in that by
using special filters, it changes the opacity from a zero to us being able to
actually see the color of the light in this layer of gas, blocking out all the other
colors that would have hidden this color otherwise.

Well now, I’ve come full circle with opacity!  And what does this have to do with my
observations today?  Well everything to be honest.  Opacity is what strives us to
find new filters for trying to tease out as much detail as we can.  And there’s
information to be had if we can look at different layers of the sun.  In my
observations today, I viewed in both the photosphere and the chromosphere.  Two
different gas layers with a temperature difference of over 4000 degrees Kelvin
(chromosphere at 10,000 K and photosphere at 5780 K).  Each will allow us to see
slightly different details on the Sun and each are important to consider while
studying it.

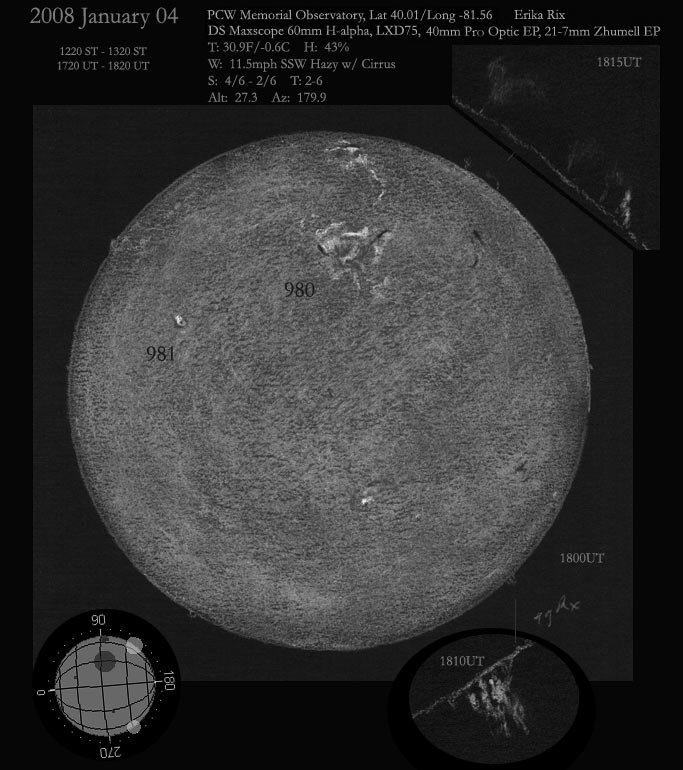
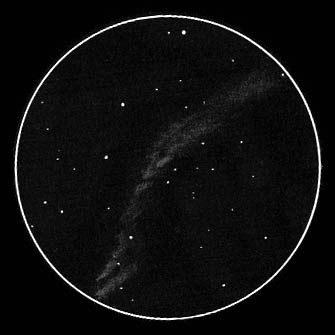
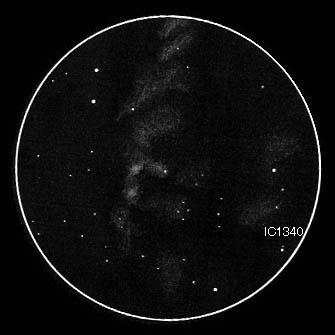
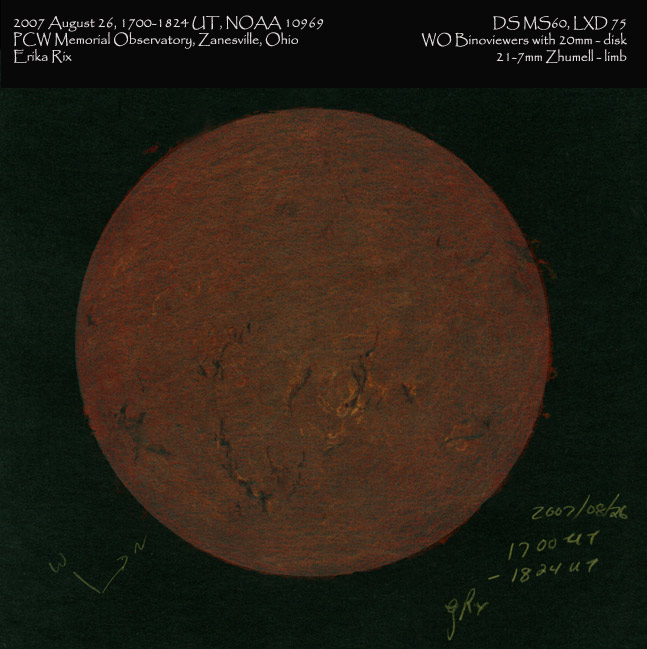
This first observation was recorded in hydrogen alpha.  You can see the effects of
the magnetic fields through the long fingers of the filaments holding the cooled
dense gas in place.  Although this observation is mainly in the chromosphere and
lower parts of the corona, the filaments are generally held in place by regions of
opposing magnetic polarity within the photosphere.  Of course this is also the case
for the prominences, as prominences are filaments above the limb where the gas is
set in front of the black sky instead of the disk.  Although the filaments were very
impressive on the disk itself, they were not so impressive on the limb today.
Having said that, take a look at the faint section of prominence that appears to be
floating off the limb in the WNW region.

NOAA 10969’s plage intertwined and reached out with crooked fingers. 

White light 

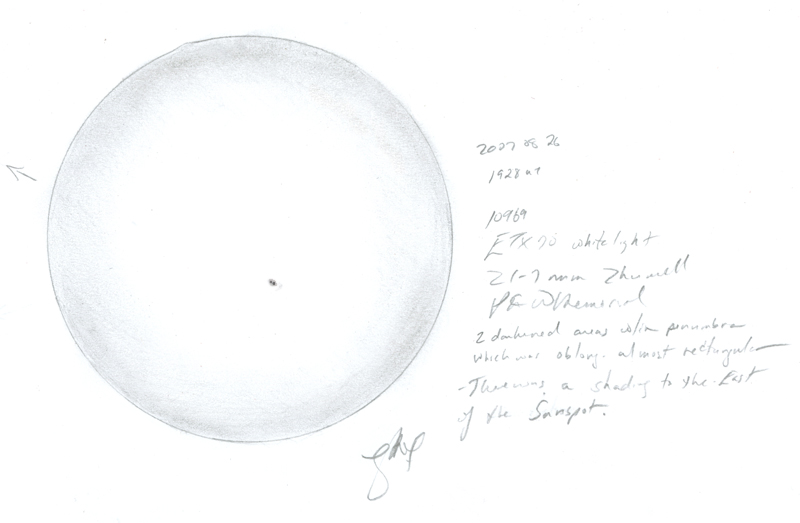
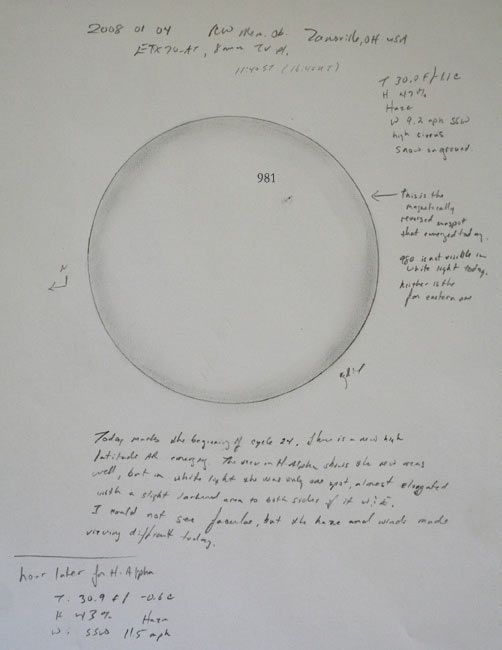
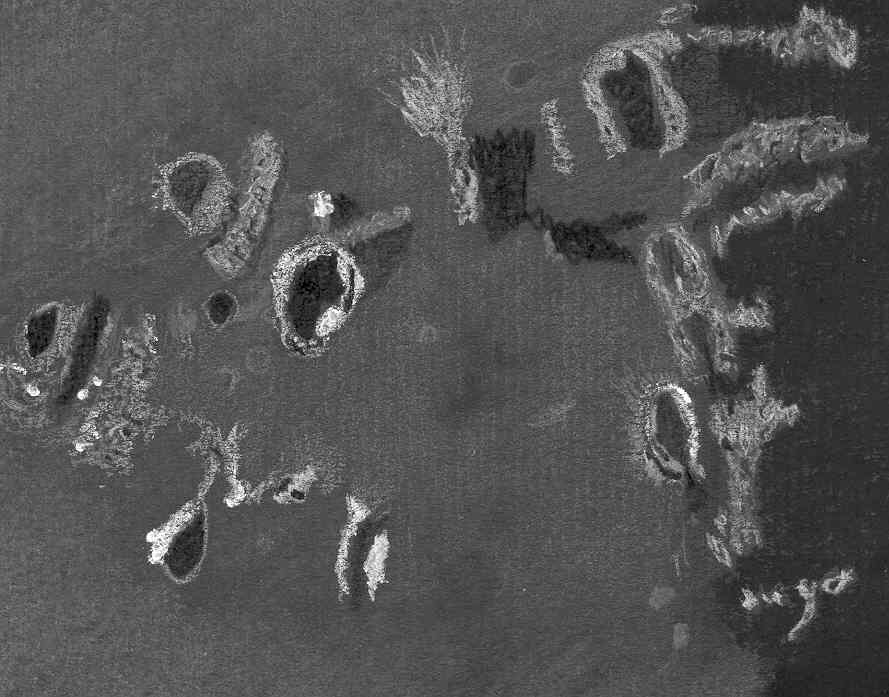
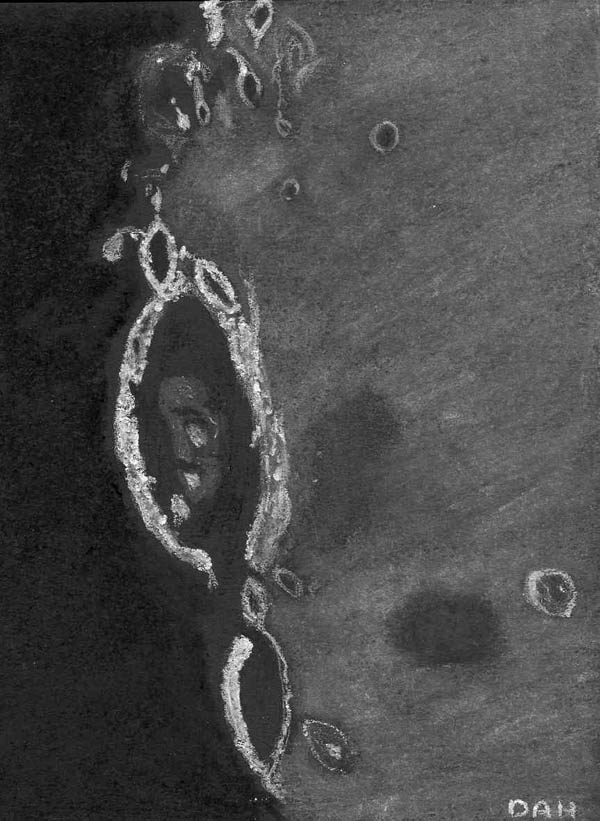
The next observation was using a white light filter where over 99.999% of the Sun’s
light is blocked out, making it possible for me to view the photosphere.  This is
called white light.  You can see NOAA 10969 in the cooler layer.  The chromosphere
becomes invisible to me again.  The two dark sections of umbrae within the penumbra
of this action region were very prominent.  I could see a darkened outline of the
penumbra and it had an almost rectangular shape with curved corners.  Of particular
interest was the very faint darkened area to the right of the sunspot.  This happens
to me fairly often, seeing little bonus features like this.  I’m still not sure what
causes it.  Normally I would think it was contrast from faculae that I was unable to
discern.  Normally we can only see faculae closer to the darker limb regions. But
often I can see an outline of contrast suggesting faculae present when the active
region is toward the center of the disk.

This time it is a little different.  If I didn’t know any better, it looked like a
thick triangular cooler region next to the sunspot.  By this I mean cooler than the
photosphere, hotter than the umbra, and only just slightly hotter than the
penumbrae.

With so much to learn concerning the sun, at least we learned one new word.  It’s a
start in the right direction anyway. 

Erika Rix

On the shores of a Stormy Ocean

Hevelius and neighbors 

Hevelius & neighbours

Sketched on the 29th May 2007 from my home observatory using a Antares 105mm F15
Achromatic refractor. Working at 163x through a Denk binoviewer.

Sketch made on a black spiral bound Daler-Rowney 6″x6″ sketch pad using a
combination of Conte sticks, watercolour and pastel pencils. Image scanned in
Greyscale but unprocessed.
  
Dale Holt

Brightest Heliocentrist

Aristarchus

When I visit the Moon with my telescope, unless I’m working with friends on a collaborative project, I like to see what takes my fancy when I reach the terminator. Invariably something catches your eye and just won’t let it go, that is what I go for, he who shouts the loudest. On the evening of Saturday April 28th it turned out to be Aristarchus magically illuminated along the terminator.
  
I used my Antares 105mm F14.3 refractor, viewing through a Denk binoviewer
yeilding 163x.
  
Using a black sketching pad and a mix of watercolour pencils, pastel pencils and
conte sticks after 15 minutes this was the result.
  
Dale Holt

Fire in the sky

The Flame Nebula 

I used a Watec 120N deep sky video camera running through a Synta 6″ F5 refractor to display a real time image of ‘The Flame Nebula’ NGC 2024 on a TV monitor. This image was Superior to that at the eyepiece of my 14″ F5 Newtonian on which the refractor rode even when employing a UHC filter!

Using light weight black card, white watercolour pencils and blending stumps I attempted to record the spectacle as best I could, resulting in this scanned and totally unprocessed image.

Dale Holt