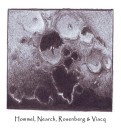
I hereby send you my latest sketch of some nice and interesting Moon Craters. Each of the craters was visible in different ways and this is the spice of the whole thing. Hommel was almost fully in dark, Nearch and Viacq was half in dark but half in sunlight, and Rosenberg in fully sunlight. It made the sketching more difficult, but for me it was even more interesting.
Date: 31st October 2011, UT: 16:30 – 17:30
Equipment used: 130/650 SW, 130x, Meade neutral filter
Media: Graphite pencil used on white paper
Title: Langrenus crater
My name: Silvia Fabi
Object name: Langrenus
Type: crater
Location: Ferrara
Date: 15/01/2013
Media: 6B and 2B pencil, white pastel
Seeing: II (Antoniadi scale)
Description: this crater is deep 2,7 Km and it has a diameter of 32 Km. Around the crater there are a lot of laudslapes and the walls are terraced. The central peak reflects a shadow on the floor of the crater.
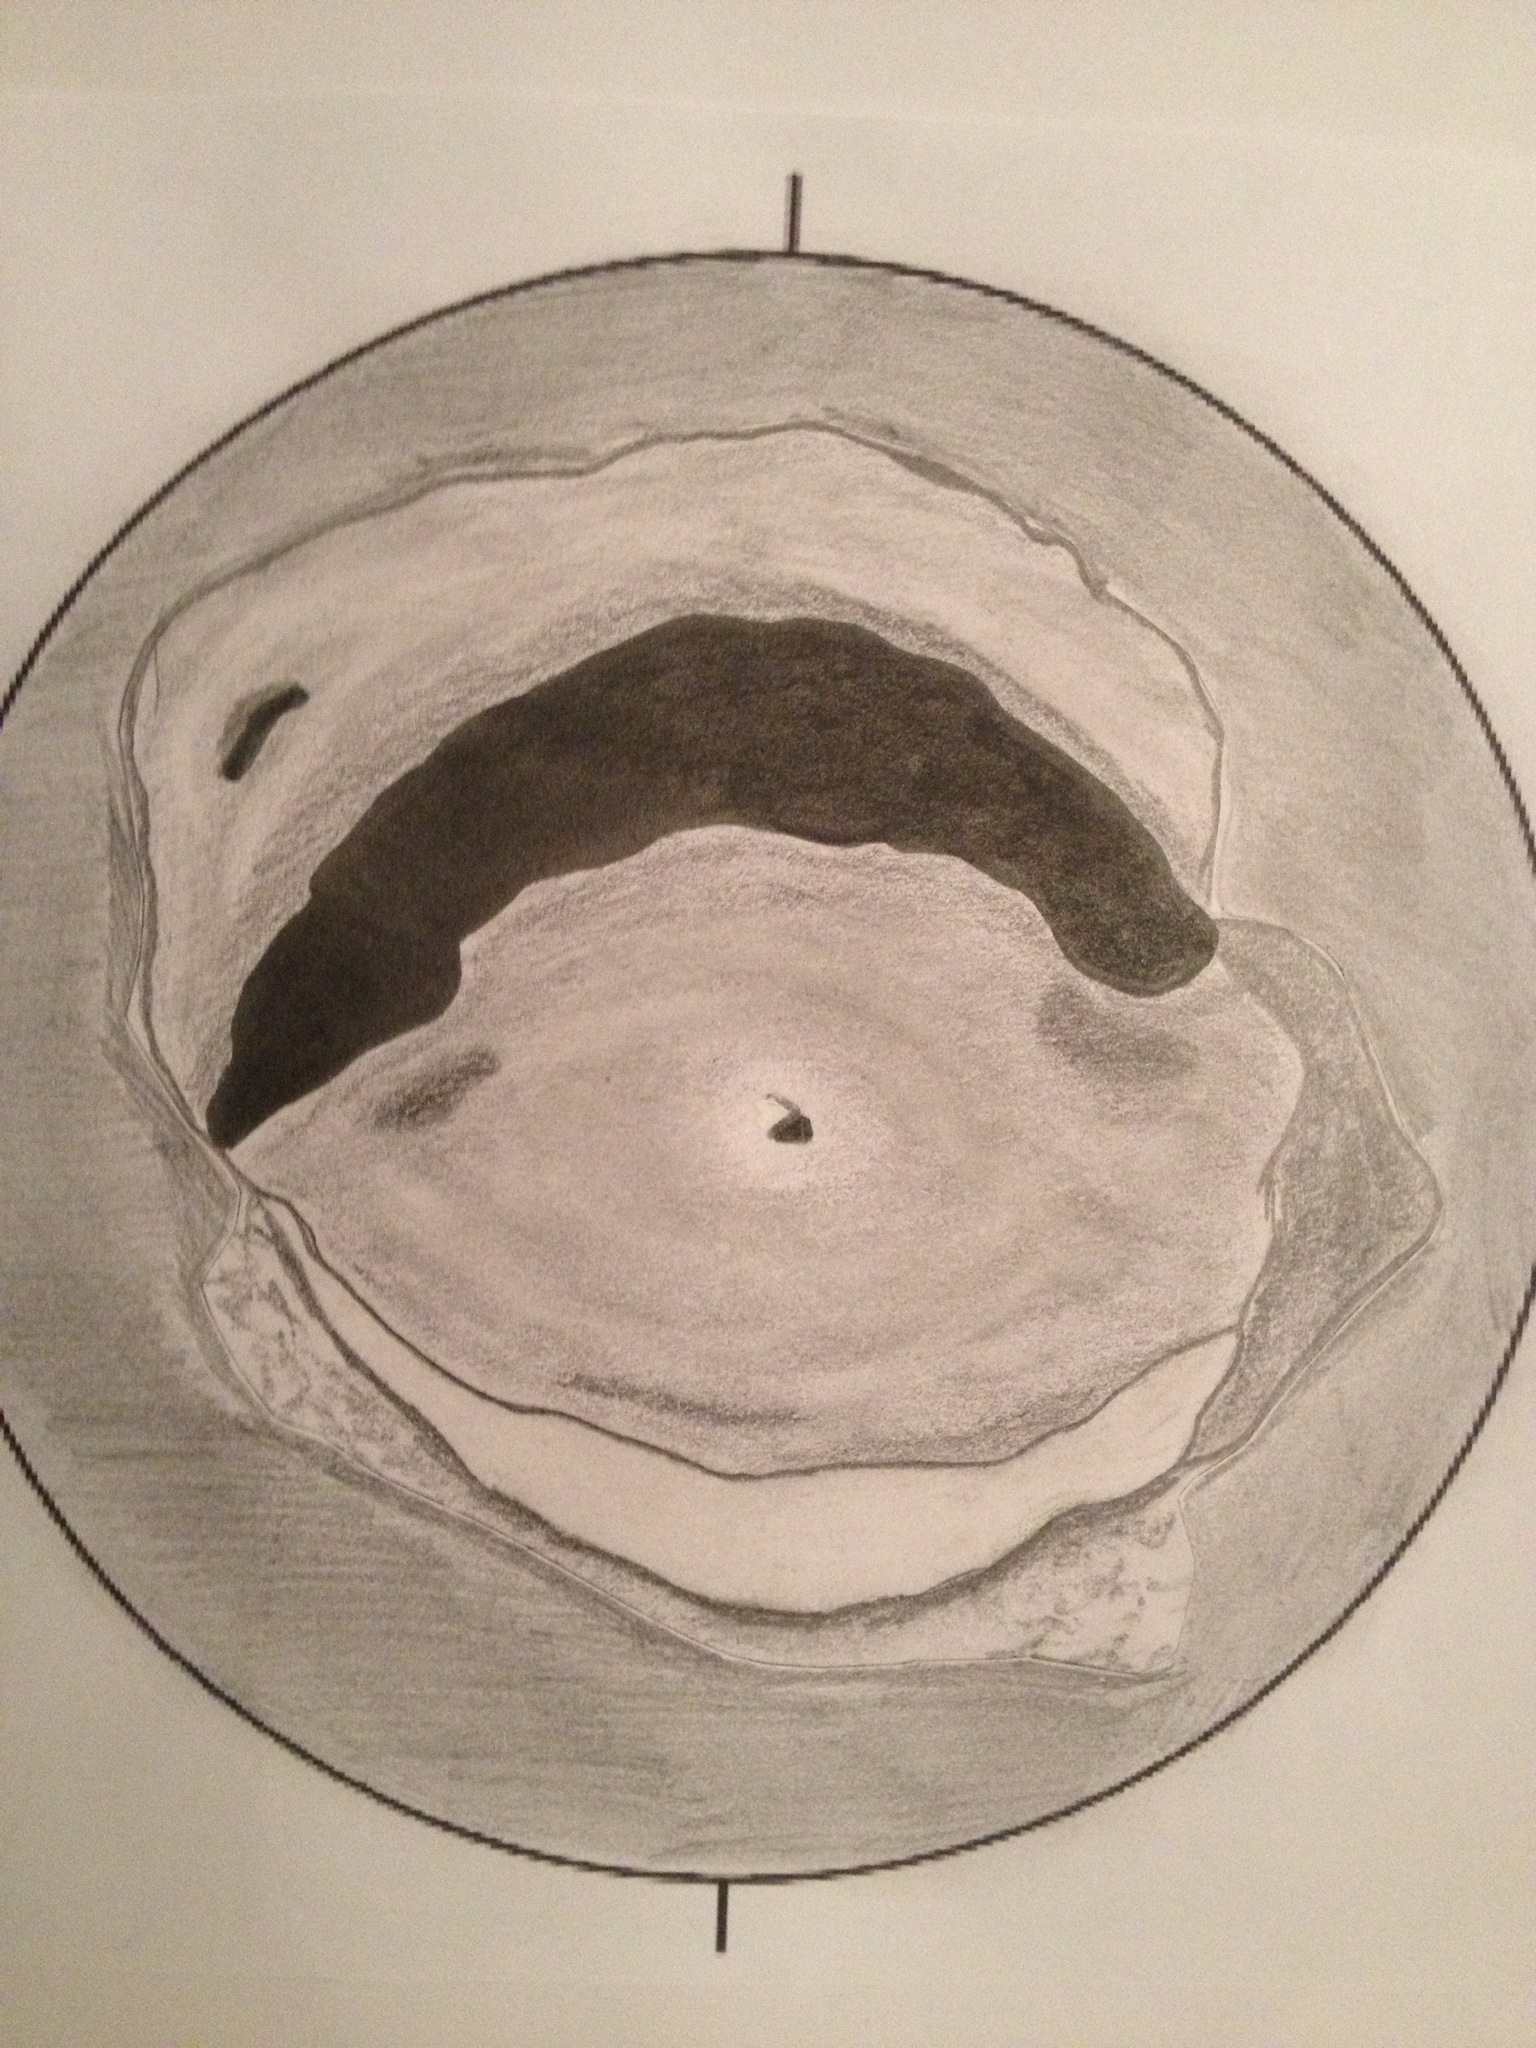
With the first clear night in more than one week, I was able to catch the sunset across crater Posidonius (99 km) at the northeastern edge of Mare Serentatis. Posidonius A (11 km.) , the highest of the small central peaks and the tilted and uplifted concentric ridge were the last features catching the light at sunset inside the rim. Also visible and included in this sketch was the northern most portion of Serpentine Ridge. As temperatures were falling throughout the night, I found myself stopping to warm my hands indoors not once but several times. The lunar viewing was excellent this night.
Sketching:
For this sketch I used: black Strathmore 400 Artagain paper, white and black Conte’ pastel pencils and a blending stump.
Telescope: 10 inch f/ 5.7 Dobsonian and 9 mm eyepiece 161X
Date: 01-02-2013: 04:30 – 06:00 UT
Temperature: – 16° C (2° F)
Clear, calm
Seeing: Antoniadi III
Colongitude: 150°
Lunation: 19.83 days
Illumination: 79.6%
Lunar-Apennines with Archimedes, Aristillus, Autolycus, Mons Hadley , Rima Hadley and…. Apollo 15 landing site—one of the most scientifically successful missions!!!
Yours, Robert
Sketch details:
Object Name: Apollo 15 landing site
Object Type: Moon
Location: Poland, Oborniki
Date: 21.12.2012!
Equipment: Newtonian telescope 409/1800 (Capella 41), 14mm ES eyepiece
Object: – Artist: Robert Twarogal (Ignisdei)
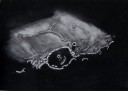
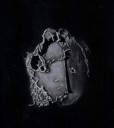
2012 06 02, 0130 UT – 0330 UT Babbage and South
PCW Memorial Observatory, Texas, Erika Rix www.pcwobservatory.com
Celestron Omni XLT 102mm, 24-8mm Baader Planetarium Mark III Hyperion, 2x Barlow, 250x
Temp 72° F, 6S: Antoniadi III-IV, T: 5/6, Phase: 33.8 deg, Lunation: 12.07 d, Illumination: 91.5%
Lib. Lat: +03:34, Lib. Long: -02:00, Az: +135:52, Alt: 29.04
Eyepiece sketch on white acid-free card stock, black felt-tipped artists pens.
The eastern walls of impact crater Babbage formed dramatic streaks of thick shadow across its lava-filled floor. The highlighted areas of Pythagoras and Oenopides to either side of Babbage created slender chunks of light depicting the highest peaks of their rims. I was very tempted to sketch the entirety of the trio and would have most likely done so had I been using charcoal or chalk for media instead of a stippling technique.
Stippling is a very old and disciplined method of rendering the Moon, not to mention tedious. Done correctly, the results can be very accurate with magnificent observation records. I have a book of selenographer Harold Hill’s observations filled with his wonderful sketches, quite a few of them stippled or created with ink wash. http://www.amazon.com/Portfolio-Drawings-Practical-Astronomy-Handbooks/dp/0521381134 “A Portfolio of Lunar Drawings (Practical Astronomy Handbooks)” by Harold Hill. He carefully drew line sketches and used a tonal scale legend to depict density of shadows. Later, away from the scope, he would create a “finished” sketch with ink using his outlined eyepiece sketch as a guide. He stated (on page xvi), “One advantage of this system is that, provided the original drawing is conscientiously done, it is possible to prepare a satisfactory “finished” representation of what was seen two days, two weeks or even two years on without having to rely on that notoriously uncertain faculty – memory.”
By making a line drawing, it is possible to very quickly capture shadows, freezing the sketch in that moment. For this reason, I often find charcoal on white paper best to use 30 degrees or so from the terminator as it takes me longer to draw in the shadows with that medium. There are other options for capturing fast moving shadows. My friend, Rich Handy, introduced me to white chalk on black paper. Sketching the highlights can save quite a bit of time in a fast moving scene, such as shadows moving across the lunar surface as the terminator progresses. If you opt for black on white instead, you can still “freeze” the scene by concentrating on all the shadowed areas first and then work on the less pressing features.
It’s not the full proof, but what is really? An argument against redrawing the sketch away from the eyepiece is that there is only so much detail you can fit in a schematic line drawing. To recreate the drawing on a later date runs the risk of inadvertently adding more detail to the sketch than what you actually saw or simply remembering the details inaccurately because the notes and schematic sketch perhaps didn’t supply enough information.
On the flip side, how could a person draw a detailed sketch close to the terminator quickly enough to capture an accurate rendering because the fast shadow movement constantly altering the scene? I believe there’s no method that is without faults…yet both have great merits and will certainly make you a more conscientious visual observer as a result. Either way, it’s imperative that if you’re striving for accuracy true to your observation, you must make a dedicated and fastidious effort to sketch exactly what you see rather than enhancing the sketch to make it more pleasing to the eye.
I tend to struggle remembering details well enough from the time my eye leaves the eyepiece to the time it takes to looks down at the paper to sketch. I have more difficulty trying to recreate the scene that same night after packing up my gear, let alone the next day or days after the observation. My schematic sketches leave more to be desired as far as details are concerned, although I’m sure that like anything else, practice makes perfect as the saying goes. I have been playing around with stippling at the eyepiece using felt-tipped pens. The results don’t hold a candle to the likes of experienced sketchers such as Harold Hill who use that technique but I’m improving and am enjoying the experience.
I outline the brightest areas beyond the terminator first and then fill in the blackness. The lunar features almost create themselves as a result. The black shadows within craters on the lunar disk are next and then the darker tones on the surface, both shadows and darker albedo tones. The brightest areas on the surface appear by default and can be sparingly stippled as needed.
The most difficult part of the process for me is eyestrain, especially as I’m far sighted. All those dots tend to run together after awhile. (So far, I’ve rarely had the need to use my reading glasses while sketching at the eyepiece. I hope that time doesn’t come.) I also tend to be heavy handed with the pressure I use on the pens, which result in a busy sketch where the features are difficult to digest. My dots aren’t uniformed and I feel the sketch would have been much improved had I given more time for proper spacing. The sketch lacks the very fine, delicate stippled effect of the masters for that technique, but I feel fairly confident that the scene was captured as accurately as my skills and stippling experience allowed.
Walled plain South was very difficult for more me as it mainly consisted of tonal ranges instead of defined boundaries. Looking at my sketch now, I could have done a better job at not filling in as many dots for the lighter, higher areas that haven’t been completely covered with lava.
Object Name: Chain of lunar craters Ptolemaeus, Alphonsus & Arzachel.
Media: Graphite pencil and white paper.
Explanation:
It is not always possible visual observation. Do not despair. It is a good time for to improve drawing techniques practicing, a “not observational” astronomical drawing its a good school for a beginners like me.
This sketch, not observational, is based on a Sergi Torrents (Sergit) astrophotography.
Ptolemaeus, Alphonsus and Arzachel are three craters beautiful geographically chained, but their names also are historically chained in to the science of astronomy.
Crater Ptolemaeus:
It forms a circular walled plain of 158 km in diameter to 1.8 º and 9.2 º South West which highlights the crater Ammonius of 9 km in diameter. Just above it the Ptolomeus B of17 Km.
Get the name of the Egyptian astronomer Claudius Ptolemy, who lived in the second century. He is known for his astronomical treatise Almagest, preserved by Arab astronomers, which is the most comprehensive ancient catalog of stars and was used by astronomers until the early Middle Ages. The Almagest describes the geocentric model and the apparent movement of the stars and planets.
Crater Alphonsus:
Circular crater 121 km in diameter. It contains a central mountain, craters, hills, and is crossed by Rimae Alphonsus.
It takes its name from Spanish King Alphonsus X, called the Wise, which ordered translate into Spanish language all the works of Al-Zarqali (Arzachel).
Crater Arzachel:
Circular crater 100 km in diameter, with high walls that reach 6,000 meters forming terraces. Highlights in its inside your central mountain 2,700 meters high and the crater Arzachel A of 10 km wide.
The name Arzachel is the English translation of the Spanish name Azarquiel, Spanish astronomer whose Arabic name is “Abu Ishaq Ibrahim ibn Yahya Al-Zarqali”. Autodidact astronomer, among his many contributions include a new type of astrolabe known as “astrolabe Zarqali” or Azafea that enables computation and astronomical observation at any latitude, very important for navigation at your time. Based on observations from his city, Toledo (Spain), between the years 1061-1080 compiled “The astronomical tables of Toledo” of such precision that even eight centuries later still were used by Pierre Simon de Laplace. Arzachel also corrected Ptolemy data on the length of the Mediterranean, according to Ptolemy was 62 º and Arzaquiel determined that it was only 42º, which ties to name of first crater of this chain.
My thanks to Sergit for letting me practice with their astrophotography.
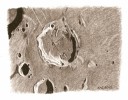
This 40 km diameter bright crater is always clearlly seen with a small telescope.
The inner surface of this crater looks like as to be painted with some dense bright white material .
Last winter , I observed / sketched this crater using my trusty 8 inches refractor at x340 .
While I was observing, the zet- black shadow of eastern rim more and more covered the flat bottom surface until the small round central peak only remaind,. …. that was impressive .
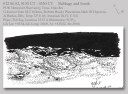
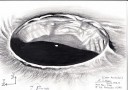
I set up to sketch Rupes Recta on the floor of Mare Nubium. From the eastern edge of Mare Nubium you can see the triplet craters, Thebit (57 km), A and L. Next moving westward is the Imbrian escarpment Rupes Recta , not a true wall in the usual sense but on one side standing more than 300 meters high at some locations and 114 km in length. The scarp face would be visible from the rim of young crater Birt’s (17 km) to the west of “straight wall” if you could get there. Touching the rim of Birt to the east is Birt A.
Sketching:
For this sketch I used: black Canson paper (8” x 10”), white and black pastel pencils, assorted erasers, and blending stumps
Telescope: 13.1” f/6 Dobsonian working at 222X (9mm ocular)
Date: 11-22-2012 01:00-02:45 UT Temperature: 12°C (54°F)
Hazy, slightly breezy
Seeing: Antoniadi III
Colongitude 10.1 °
Lunation 8.1 days
Illumination 64.9%
Alt. 45°
Object Name Moon
Object Type Planet
Location Valencia (Spain)
Date 27th november 2012
Media: graphite pencil and white paper
Dear reader,
Finally the clouds have gone so I tried to get a nice view of the moon. It was also a photo session so after finishing the previous sketch I took a picture that it was useful to catch many details from the moon. This is my first drawing objetct and it was a pleasure to work with this amazing object day after day.
The seeing was better than usual on November 18th, so I decided to use a high magnification on my C6, and see what would catch my eye.
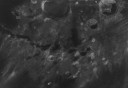
Near the edge of Mare Fecunditatis, craters Gutenberg and Goclenius stood out, with two rimae running in from the north west.
I zeroed in on the crater Goclenius itself. The Rimae run right into it. The shadows were quite stark, revealing the broken down crater walls, and the fractures on the floor were very apparent.
A pencil sketch was done at the eyepice, and a photo taken. The final sketch was then completed at leisure a couple of weeks later.
Details:
Crater Goclenius, C6 (150mm SCT, 3 x Barlow)
Adelaide, South Australia, November 18th 2012.
Medium is charcoal on white paper.