Sphere of Influence

M13 

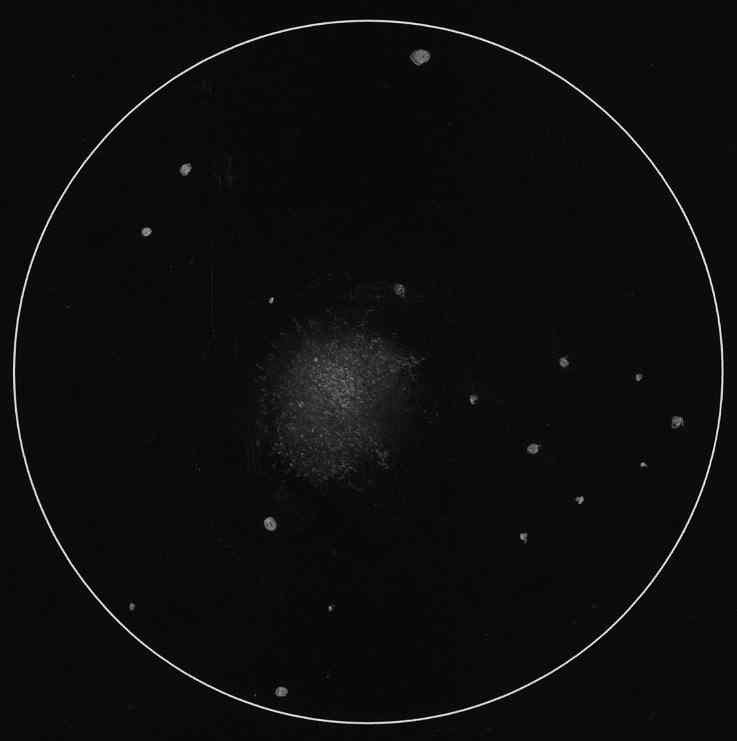
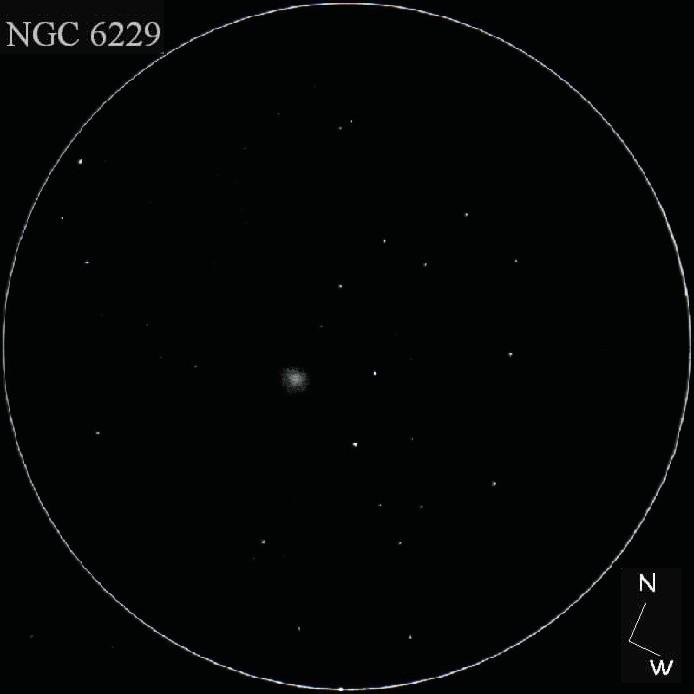
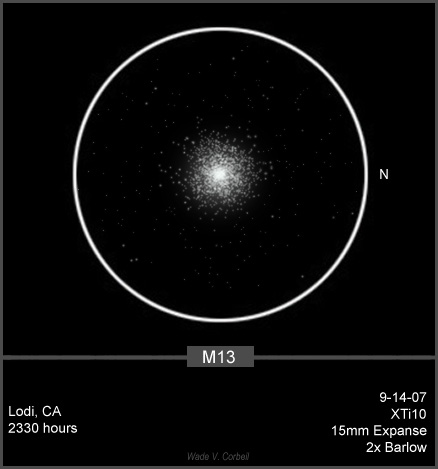
M13 – Globular Cluster

This was both a tough one and a fun one that presented some unique challenges. At
one time, I had a total of 21 layers and two separate documents in PhotoShop just to
get this thing looking halfway decent. My first challenge was, of course, the
Globular itself. I took notes to share some of the steps involved in digitizing this
sketch to share with others here.

Globular:

I started with a copy of my scanned image and reduced the opacity to 30 percent.
This allowed me to see the sketched image while making it transparent enough to see
the black background of the background layer.

I then created another layer behind the sketched image layer, chose the elliptical
selection tool and made a circle approximately ¾ the diameter of the globular
cluster, and filled it with 100 percent white. I then made a copy of this layer and
hid it for the time being. I then applied a Gaussian Blur of 9.7 to the first white
circle to soften it and create a glow. The opacity of the layer was then reduced to
30 percent to achieve a bright but subtle glow. I then used the blur tool with a
brush size of approximately 150, centered it over the blurred white circle, and
blurred the image a couple of times to get the proper effect.

I then made the copied white circle layer visible and applied a series of splatter
brush strokes to fill in the center of the globular. I’d make a brush stroke, copy
the layer, and rotated it 90°. I then applied another splatter brush; copied and
rotated until I got the star-scatter that closely resembled my original sketch. I
used the eraser tool quite a bit to get rid of stray or out-of-place stars.

I then created another layer and, using the paintbrush tool, used a variety of brush
sizes from 1-4 to add the stars immediately surrounding the Globular. The opacity
was changed from anywhere to 25 percent to 50 percent depending on the particular
stars or series of stars I was recreating and to create a bright, but not too bright
look to the stars.

I copied the above layer and set the opacity to 60 percent and set the layer mode to
difference. This softened the edges while maintaining a bright core to the stars.

Background Stars:

This is where the fun (and time) began. As many of the fainter stars were seen with
diverted (averted) vision, I had to create a way to try and make the stars appear as
I actually saw them. A weird combination of bright, but not so bright as to be
blinding, yet dim enough that it takes a second look to see them.

Once again, I started with the paintbrush tool set to a diameter of between 1 and 3,
and placed the stars as they appear in my original sketch. (Remember, the original
sketch is still visible on its own layer, just at a reduced opacity) The opacity of
these background stars never exceeded 60 percent. I tried to increase the opacity,
but then the stars started to look artificial.and definitely not how I actually saw
them.

I actually created 3 separate layers for this. One for a brush size of 1, another
for a brush size of 2, and the last for the brush size of 3. This way I could
control the opacity of the separate size/dimness of the stars separately without
effecting the entire digital star-field.

Once I had all my background stars in place, I linked the 3 layers, merged them
together, and made a copy. This made them stand out a little more, but still a
little too artificial, so I set the layer to overlay mode, and reduced the opacity
to 56 percent. I then merged all the background star layers, the globular layer, and
the blurred layer together. I then made a copy of this master layer.

I opened a new document in PhotoShop, and pasted the copied layer. I reversed the
image to a negative. Using the color picker, I removed all the white background,
leaving me with just the black reversed stars and Globular.

I then dragged and dropped this layer back into my original document. A quick Ctrl
+A+X+V cut and centered this negative image exactly over the original image. I then
moved the negative image behind the original, and applied a Gaussian Blur of 2.5.
This helped to darken the area behind the original stars and created a warm glow.

At this time, all layers except the black background layer were merged. I then used
the blur tool to soften those stars that still appeared too bright, as well as
utilizing the Burn and Dodge tools to adjust brightness as needed.

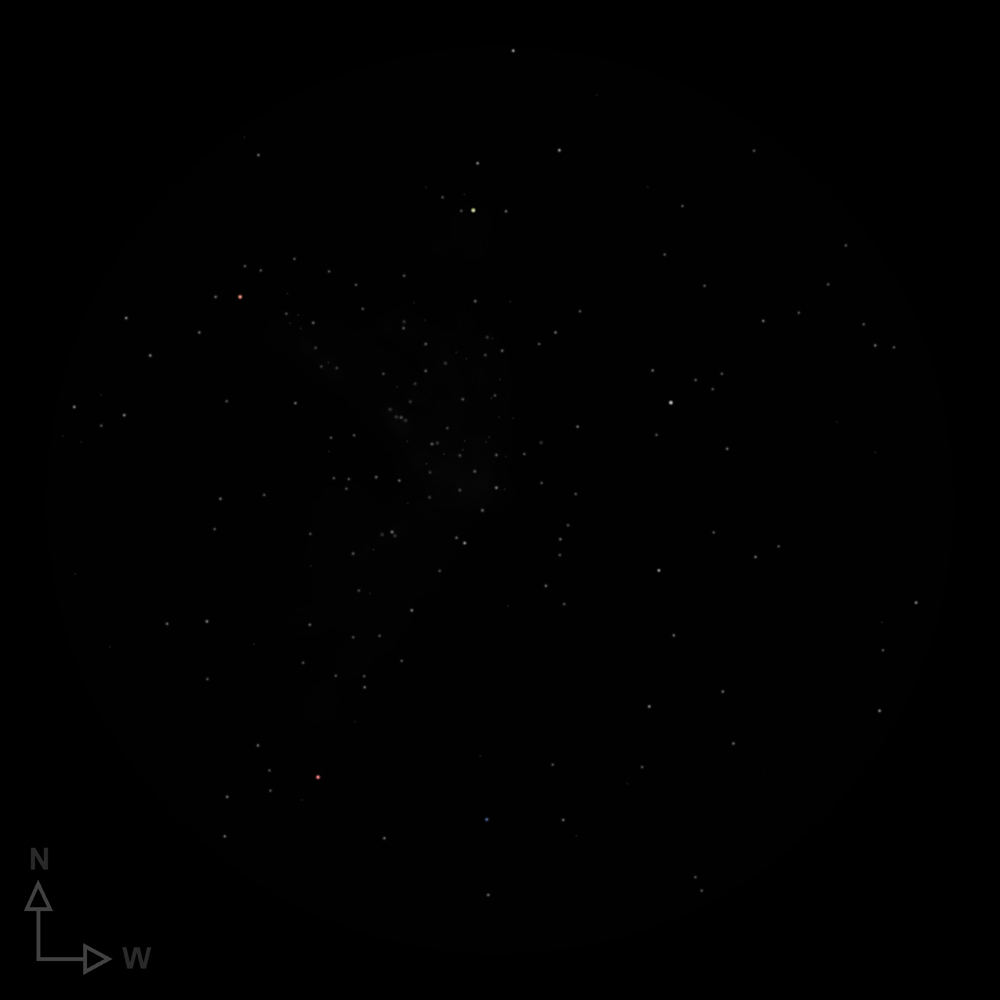
The result of all this is my digitized version of M13 based on my original sketch.
The original sketch took me about 30 minutes, and the digitized reproduction took me
roughly 30+ minutes. This has so far proven to be my most involved sketch and
digitized reproduction.
I hope it is acceptable.

Wade V. Corbeil

Sweet stellar spoonful

M15

Dear Skycombers,
   
  Messier 15 is a splendid globular cluster, granulation is fine when compared to
Messier 13 and Messier 5 ‘Salt rather than Sugar’. It is, I hope you agree a
beguiling spectacle, a veritable stellar cornucopia no less.
  
  Drawn with graphite pencil on white cartridge paper and converted to negative post
scanning without enhancement.
  
  7.9.2007,  22:40UT
   Location: Chippingdale observatory, Nr Buntingford, Hertfordshire, UK
  14″ F5 Newtonian at 118x giving a 0’35” FOV
  Seeing Ant 11-111 transparency was good.
  
  Dale Holt

Two in the midst of hundreds

Delta Lyrae and Stephenson 1 

Delta Lyrae, Stephenson 1

A drawing of a double star that was supposed to be a walk in the park turned out to
be a lot more challenging. This moonless night was filled with plenty of stars. So
was the field of view around Delta Lyrae. Countless milkyway stars were scattered
like pinpricks in the sky. Leaving them out of the sketch was no option. I also read
that Delta Lyrae is part of a sparse little cluster called Stephenson 1. I had a
hard time to recognise the grouping as a cluster. Here is the sketch.

Date : September 4, 2007
Time : 21.00UT
Scope : Skywatcher 102/500
Meade 4000 SP 26mm
Power : x20
FOV: 150′
Filter : none
Seeing : 3.5/5
Transp. : 3/5
Nelm : 5.3
Sketch Orientation : N up, W right.
Digital sketch made with PhotoPaint, based on a raw pencil sketch.
Rony De Laet

http://www.geocities.com/rodelaet

In the court of the King

NGC 6839

 Object Name: NGC 6939 (H.VI.42)Object Type: Open Cluster

Constellation: Cepheus

Right Ascension (2000.0): 20h 31.4m

Declination (2000.0): +60° 38′

Magnitude: 7.8

Diameter: 8′

Trumpler Type: I 1 m

Telescope: Parks Astrolight EQ6 • 6″ f/6 Newtonian Reflector

Eyepiece: 7.5mm Parks Gold Series Plössl • 120x, 26′ FoV

Date & Time: 8 September 2007 • 03:30 UT

Seeing Conditions: NELM 6.3 • Pickering 8

Observing Location: Cuyamaca Mts., San Diego Co., California

Sketch Information: Digital rendition based on paper and pencil eyepiece sketch.

NGC 6939 is a subtle, yet beautiful open cluster in the southwestern reaches of
Cepheus, near the border with Cygnus.  NGC 6939 is famous for sharing a low-power
field of view with the spiral galaxy NGC 6946; this celestial odd-couple has been
the target of countless astrophotographs.  The juxtaposition of these two objects is
equally accessible to the visual observer with access to dark skies and a field of
view wide enough to accommodate the 38′ that separate the duo.

The most expeditious way for the star-hopper to locate this object is to center your
scope on 3rd magnitude Eta (η) Cephei and sweep about 1.5° east and just over 1°
south with your lowest-power, widest-field eyepiece.  At 30x, I see a fairly
conspicuous patch of nebulosity studded with a few dozen faint stars nestled in a
very rich patch of the Milky Way.  The spiral galaxy NGC 6946 glows feebly ½° away
to the southeast.

Zeroing in on this stellar concentration with higher magnifications brings out a
delicate array of faint stars ranging from magnitude 11 down to 14 and beyond.  The
soft, often glittering haze of unresolved stars persists in the background even at
high magnifications.  The stars seem to be arranged in strands stretching toward the
east like gleaming dewdrops in a broken spider’s web.  In that direction (east) it
is very difficult to discern where the cluster ends and the starry expanse of the
Milky Way begins.  The western edge of the cluster, in contrast is sharply defined,
particularly on the southwestern side.  This sudden drop-off in the stellar
population gives me the impression of an interposing finger of dark nebulosity
thrusting northwestward.

Sir William Herschel discovered NGC 6969 on September 9, 1798 with his 18.7-inch
reflector.  This cluster lies at a distance of about 4,000 light-years and is
believed to be 1.8 billion years old based on the Hertzsprung-Russell diagram of its
constituent stars.

Eric Graff

Ancient stellar city

M92 

M92 is near the top of the list for me when it comes to globular clusters. It takes
magnification extremely well, and many individual stars are clearly resolved around
a bright core. M92 would probably get more attention were it not for it’s
spectacular neighbor, M13.

This sketch was rendered on standard copy paper with a .5mm mechanical pencil. Post
processing was done with MGI Photosuite III.

Jason Aldridge
North Port, FL

Distant Globular in Hercules

NGC 6229

  Large globular clusters are always rewarding targets to hunt down from less than
ideal sky locations. In a 10” telescope from urban/suburban locations only the 9th
magnitude glow of this globular is clearly visible. Upon closer inspection the
core can be seen to brighten significantly. The angular size of this cluster looks
to be about 1.5 minutes of arc in the eyepiece. It is easy to see why 18th and
19th century observers thought this globular to be a planetary and on at least one
occasion it was reported to be a comet. At almost 100,000 light years distant, it
is challenging to resolve stars in this globular without at least 13 inches of
aperture. I could not resolve any stars of the cluster with the 10” scope. The
brightest stars in this globular cluster are about magnitude 15.5. Adding to the
eyepiece view are two well spaced 8th magnitude stars to the west listed in the
Henry Draper catalog as HD151689 and HD 151651.
  
  Sketching Date and Time: 8-12-2007, 2:30-2:50 UT
  Telescope 10” f / 5.7 Dobsonian 21mm eyepiece 69x
  8”x12” white sketching paper, B and 4B graphite pencils, a blending stump, scanned
  and inverted
  Seeing: Pickering 7/10
  Transparency: average 2.5/5
  NELM 4.1
  
  Frank McCabe

Busy as a Beehive

M44 

M 44, also called Praesepe or Beehive, is one of the greatest Open
Clusters of the night sky. Consisting of many bright stars, it is
already visible with the naked eye, the best view, however, is provided
by binoculars or a rich field telescope, which show M 44 in all her
magnificent beauty. The 1.5° FOV the Newtonian provided, when I sketched
this, was already way to small to show all the stars belonging to this
great cluster.

Date: December 24, 2006
Location: Steinwald, Bavaria, Germany
Instrument: Vixen Newtonian 4.5″ f/6 on Vixen GP
Constellation: Cancer
Seeing: Antoniadi II
NELM: 6m0
Bortle: 5
Magnification: 45x

Sebastian Lehner

Glorious Globular

M3 

Summer is approaching, the nights have become grey. But I do not stop observing.
Here is an impression of M3. I had fun teasing out as much detail as possible.
Globulars are difficult to render. The mind might see patterns that aren’t there. I
tried to remain objective. Lots of faint stars were present in the outer region of
the halo. I noticed some dark lanes in the halo, and the core looked elongated too.
I hope you like the view.

Date : June 5, 2007
Time : 22.30UT
Scope : ETX 105/1470
Meade 25mm and 15mm SP
Power : x66 to x100
FOV: 35′
Filter : none
Seeing : 2.5/5
Transp. : 2/5
Nelm : 4.9
Sketch Orientation : N up, W right.
Digital sketch made with PhotoPaint, based on a raw pencil sketch.
Best Regards,
 
Rony De Laet

http://www.geocities.com/rodelaet, my personal website.